Showing posts with label Funny Tricks. Show all posts

Google's Fun Facts

Google's Fun Facts.

Use Google to learn a Quick Facts each day, Go to www.google.com and search "Fun Facts", you will get some interesting information to read. The result could be any fun facts from any of the information in this world or out of the world. Give it a try, you will be surprised with some of the facts.


Topics

1) Code your Server.js - Node.js main file
        i) Importing libraries
        ii) Create Server and Handle Request
        iii) Play with Socket.io to do MultiChatting
2) Develop Webpage with Socket Javascript
3) Download Project here


1) Code your Server.js - Node.js main file

i) Importing libraries


 var http = require("http");
 var url = require('url');
 var fs = require('fs');
 var io = require('socket.io');

ii) Create Server and Handle Request

var server = http.createServer(function(request, response){
 
 var path = url.parse(request.url).pathname;
 console.log('Path='+path);
 switch(path){
  case '/':   
   fs.readFile(__dirname + "/index.html", function (error, data) {
    if (error) {
     response.writeHead(404);
     response.write("opps this doesn't exist - 404");
     response.end();  
    }  
    else{ 
     response.writeHeader(200, {"Content-Type": "text/html"});  
     response.write(data, "utf8");
     response.end();  
    }
   });
   break;
   
  case '/socket.html':
   fs.readFile(__dirname + path, function (error, data) {
    if (error) {
     response.writeHead(404);
     response.write("opps this doesn't exist - 404");
     response.end();  
    }  
    else{ 
     response.writeHeader(200, {"Content-Type": "text/html"});  
     response.write(data, "utf8");
     response.end();  
    }
   });
   break;
   
  default:
   console.log(path +"- Not found");
   response.writeHead(404);
   response.write("opps this doesn't exist - 404");
   response.end();
   break;
 }
 
});
server.listen(8001);

iii) Play with Socket.io to do MultiChatting


var serv_io = io.listen(server);
var textarea="";
var name="";
serv_io.sockets.on('connection', function(socket){
 //send data to client
 setInterval(function(){  
        socket.emit('date', {'date': getCurrentTime()}
 );
  
    }, 1000);
 
 socket.on('client_data', function(data){
  textarea=data.textarea;
  name=data.name;
  console.log("name="+name);
  //socket.emit('textarea', {'textarea': data.textarea});
  emitData(socket);
 });
 
    
});

function emitData(socket){ 
 socket.broadcast.emit('message', 
  {'date': getCurrentTime(),
   'name' : name,
   'textarea':textarea
  }
 );
}

function getCurrentTime(){
 var d = new Date();
 var curr_date = d.getDate();
 var curr_month = d.getMonth()+1;
 var curr_year = d.getFullYear();
 var curr_hour = d.getHours()%12 +"";
 var curr_min = d.getMinutes() + "";
 var curr_sec = d.getSeconds() + "";
 if(curr_hour.length == 1)
  curr_hour="0"+curr_hour;
 if(curr_min.length == 1)
  curr_min="0"+curr_min;
 if(curr_sec.length == 1)
  curr_sec="0"+curr_sec;
 
 //var dateString = sprintf("%2s-%2s-%s %2s:%2s:%2s ",curr_date,curr_month,curr_year,curr_hour,curr_min,curr_sec);
 var dateString = curr_date + "-" + curr_month + "-" + curr_year + "  " + curr_hour +":"+ curr_min +":"+ curr_sec;
 
 return dateString;
}

2) Develop Webpage with Socket Javascript

<html>
  <head>
    <script src="/socket.io/socket.io.js"></script>
 <script src="https://ajax.googleapis.com/ajax/libs/jquery/1.7.2/jquery.js"></script> 
 <style>
 .common{
  width: 200px;
  height: 30px;
  padding-left: 10px;
  
 }
 #date{
  color: green;
 }
 </style>
  </head>
  <body>
    <script>
  var socket = io.connect();
  socket.on('date', function(data){
   $('#date').text(data.date);
  });
  
  socket.on('message', function(data){   
   message=data.textarea;
   len=message.length;
   if(len > 0){
    printMessage(data.name,message);     
   }
  });
  
  
  $(document).ready(function(){
   $('#textarea').keypress(function(e){
   if ( event.which == 13 ) {
    message=$('#textarea').val();
    len=message.length;
    strname = $('#name').val();
    if(len > 0){
     socket.emit('client_data', {'name':strname,'textarea': message}); 
     printMessage(strname,message);     
    }
    $('#textarea').val("");
   }    
  });
  }); 
  
 function printMessage(strname,message){
  $('#messagearea').html($('#messagearea').html()+"<br/><span style='color:blue;font:18px;'>"+strname+"</span> : "+message);
 }
    </script>
    <div><h1>Welcome to Node.js Socket.io - Simple Multi Chat Application</h1></div>
 <b> Get tutorial here (Post your comments and query)</b> - <a href='http://www.coolcomputerpctricks.com'>www.coolcomputerpctricks.com</a><br><br>
 <b> Get Latest Code here </b> - <a href='https://github.com/karthikeyan98'>https://github.com/karthikeyan98</a>
 <br><br>Current Time: <span id="date"></span><br/>
 <input type="text" id="name" value="Guest" class="common"> - Type Name here<br/><br/>
 <textarea id="textarea" class="common"></textarea> - Type Message here and press Enter.
 <div id="messagearea"></div>
  </body>
</html>

3)  Download Project here

GitHub - https://github.com/karthikeyan98/SimpleMultiChat

Post your comments and query for any help.

Are we trusting Google too much?

Are we trusting Google too much?

1. why should chrome warn us with a message when we clear browsing history?


Whenever we try to clear browsing history, chromes tells that there is incognito mode to use, is Google worried if you clear your entire browsing history from chrome?

What does Google do with your browsing history?
Here's a clear evidence, "YouTube", Google's YouTube shows video contents relevant to our browsing history stored in chrome. that's how your information is used to make you use their product(YouTube) more than what you do normally.
you can find the difference when you go to "YouTube" home page in both conditions
1. first without browsing history - everything cleared in chrome- visit YouTube home page
2. after doing couple of Google searches, let chrome shows some history and visit YouTube, you will feel the difference

2. why should chrome has separate log in session separating it from other google products.

when you logged in chrome, also when you logged in some of other google product like gmail, when you signout of gmail,chrome logged in session wont go.

chrome separate login session stores all your data ( you can control it by visiting settings, how many of us do that, what about people who doesn't have enough computer experience to change the settings ) user specific data stored in each of our google account right from browsing history to form input data's.

3. How does google map works - showing traffic information in the road we travel.


It does collect our location information including in which speed we are traveling, it collects every one who uses android mobile or signed in to google map atleast once and using some algorithm it gives back.


4. What will happen with Google Glass?

                    XX_____XX 

5. Not just above four items, there are lot more things.. like

     At first time when you open Google Chrome, it asks you to sign in with Google account. How many of you signed in without knowing that it is a log in for Google chrome to save your personal browsing data  in your account?
      Many would have no idea initially that it is a log-in specially for Google Chrome. and would have signed in directly thinking it is normal google product sign-in.

 Obviously, we are very much benefited and addicted to all those products, and there are ways we can control sharing our data to a certain level, but how many of us are really concerned about it, going to settings, searching where it is and switching it off?

Google's New Scientific Calculator

Google Launches its New Scientific Calculator.


If you type "Calculator" or "99/9" in google search, you will get the googles All New Scientific calculator.
Or if you do any mathematic calculations right away it will bring its Advanced Mathematical calculator
Try typing these things in google search for getting Google Scientific Calculator

Search it in Google - Calculator , 99/9 , Sin(90) , Sin 90,  log10 , like any mathematical calculations.
Its is as fast as google search results.


Make Desktop wallpaper screensaver unchangeable

Make Your Desktop Wallpaper , ScreenSaver to be unchanged by anyone.


This trick is for Windows 7, it will work with windows vista and previous versions as well.


Step1: Open Run Window..


To open Run Window press( WindowsKey+R) or Click StartMenu and type Run to get it


Step2: Enter gpedit.msc in Run Window and press enter.


Step3: Now the Local Group Policy Editor Window will be opened ( look the picture below )


Step4: In the Left Pane of Local Group Policy Editor window Click User Configuration--> Templates ( look the picture below )


Step5: In the Right Pane of Local Group Policy Editor window Double Click Control Panel ( look the picture below )


Step6: Now In the Right Pane of Local Group Policy Editor window Open Personalization--> Changing desktop background ( look the picture below )


Step8: Now you will get a Prevent changing desktop background window, click Enabled Option and press Ok. ( look the picture below )


Step9: Now you can’t change your Desktop background Image. ( look the picture below )


Step10: To Once again Make the Desktop background to changeable Make the Option as Not Configured in Prevent changing desktop background window.


Step 11: Do the Same for Screen saver, Desktop icons, mouse pointers etc..

Google Chrome gets a new Icon

Google Chrome icon changed


New Chrome ICON
Old Chrome ICON


The new Google Chrome Icon is very simple and looks like it's a 2 dimension of the old chrome icon.

The new Icon has been changed automatically for all the users of chrome browser. it seems like update is going on for the application without the users knowledge.

Simple things are always powerful - secret of Google.

Two Secret Shortcuts for Windows 7

Two Secret Shortcuts for Windows 7 - Computer cool Tricks


ShortCut-1 : press WindowsKey + x


you will get Windows mobility center, where u can control things like

  • wifi adapter on/off
  • display brightness
  • volume control
  • projector or external display
  • battery charging and power options
  • synchronization
  • etc...


Shortcut-2: click and shake at top of any window faster.


This makes minimize all other opened windows, except the one u shaked.. a cool trick to your windows computer while working with multiple applications..


To test it do the following.

step1: Open up multiple windows of any choice ( like notepad, paint , browser ...).


step2: click on top of any of the window and shake it twice ( just hold your mouse button and move left to right and right to left twice fastly).


step3: u will notice that, all other windows getting minimized.


step4: also if u do that again, u can restore all the windows back.

Interesting !!! Google Vs Bing , Unbelievable Trick try it yourself.

Interesting !!! Google Vs Bing , Unbelievable Trick try it yourself.
Have you ever tried Automattic currency Conversion in Google or Bing search, There lies this interesting fact.Just have a look at it.. perhaps wait! how about Exploring this interesting crazy fact on your own with the help of following steps.

Step 1: Open your favourite Web browser twice (two windows or two tabs) open www.google.com in one and www.bing.com In another.


Step 2: Type the following in both the search bar and hit Enter.

1 euros in usd

Step 3: Well I searched at this time December 5 2010 8.24 pm look what I get. Having two different answers for same question

Google said 1 Euro = 1.3382 US $

Bing said 1 Euro = 1.34246 US $


Step 4: Which one is correct??????????!!!!!!!?????????

Step 5: Well According to Yahoo (OMG!!! another search engine) Currency convertion at this page http://finance.yahoo.com/currency-converter/#from=USD;to=EUR;amt=1.3399 says both are wrong.

Step 6: Well Let’s try some other site to verify it http://www.xe.com/ucc/convert.cgi?Amount=1&From=EUR&To=USD&image.x=63&image.y=21&image=Submit which says Google Data is better than bing and yahoo but not Accurate though !!!!!!.
Enable and Disable Thumbnail view (Most visited / Recently Closed) on the New tab of Google Chrome Browser

Disable
By Default you have the thumbnail view enabled, closing or disabling this view is very simple

Step 1: just click X – close button on the right side of the Most Visited or Recently closed frame.

Step 2: After clicking it, the thumbnail view will disappear.

Step 3: Though the thumbnail view disappeared, u can access the most visited and Recently closed items through links on the left down of the page in a simple view.

Enable

And to get back thumbnail view of Most visited or Recently Closed items
Step 1: click the “Most Visited” link (text) in the left down corner

Step 2: You will have your recently visited links poped up, now click the “Most Visited” link in the poped up window.


Step 3: now the Most Visited view will be appearing in the top of the page, click the arrow on the left side of it.


Step 4: That’s it You have your thumbnail view of Most Visited items back.

Step 5: Do the same for Recently Closed items .

Bug Exposed in Google Chrome Browser


Google Chrome Display Bug Exposed

Google browser Chrome - one of the newest widely used browser, has a funny display problem which is exposed, try this for yourself and have a look at it..

Step: 1 - Open Google Chrome Browser (well the latest version)

Step: 2 - Open Google mail ( www.gmail.com ) and log into your account

Step: 3 - Open any of your contacts chat window just like chatting ( but we not gonna chat here).

Step: 4 - with your middle mouse button - click hold and drag down on the down left corner of the chat box. see the below picture..


Step 5: Now you see the Nasty Trick of browser scrolling out the window itself. the chrome browser scrolls outside its level.. this makes browser lost its screen display area.

now go to address bar and browse other sites and have a funny display out of it..

Store your Gmail mails in Computer without using any Email Client

Gmail Offline

Gmail Offline is a Feature where you can Store your Mails, Chats, Attachments, labels in your personal Computer without having to use any Email clients like outlook.

Gmail Offline Let you to Synchronize all your Gmail contents to your PC when your connected to internet and makes u to work with your mails while not connected.


Enabling Gmail Offline Feature

1. Log into your Gmail
2. go to Settings->Offline
3. click "Enable offline mail for this Computer" and click "Save changes" button
4. Follow the instructions and Accept to install Google Gears which is less than 1 MB.
5. After this Few minutes Process, u'r Google mail gets synchronized to your PC
6. and you can access all your gmail contets offline by clicking the "Gmail Offline" icon on your Desktop


Advantage of Gmail Offline

1. Very Simple Feature and easy to use
2. No Additional Software to be Installed like outlook express etc..
3. And More Importantly its the Google's Product you can be sure of security of your personal file's

Disadvantage of Gmail Offline
1. You cannot specify selected mails to get saved in your Pc, instead all your mails within specified years are get stored.

Creating nameless Icons ,Folders.

If you would like your desktop Icons to have no text underneath then try this tweak:

1. Right click the icon and select "Rename"

2. Now hold the "Alt" key and type "255" and hit Enter


NOTE : It may only work with the keypad numbers and not the number keys on top of the keyboard.

Change Text on XP Start Button

Step 1 - Modify Explorer.exe File

In order to make the changes, the file explorer.exe located at C:\Windows needs to be edited. Since explorer.exe is a binary file it requires a special editor. For purposes of this article I have used Resource Hacker. Resource HackerTM is a freeware utility to view, modify, rename, add, delete and extract resources in 32bit Windows executables and resource files (*.res). It incorporates an internal resource script compiler and decompiler and works on Microsoft Windows 95/98/ME, Windows NT, Windows 2000 and Windows XP operating systems.

get this from http://www.users.on.net/johnson/resourcehacker/

The first step is to make a backup copy of the file explorer.exe located at C:\Windows\explorer. Place it in a folder somewhere on your hard drive where it will be safe. Start Resource Hacker and open explorer.exe located at C:\Windows\explorer.exe.

The category we are going to be using is "String Table". Expand it by clicking the plus sign then navigate down to and expand string 37 followed by highlighting 1033. If you are using the Classic Layout rather than the XP Layout, use number 38. The right hand pane will display the stringtable. We’re going to modify item 578, currently showing the word “start” just as it displays on the current Start button.

There is no magic here. Just double click on the word “start” so that it’s highlighted, making sure the quotation marks are not part of the highlight. They need to remain in place, surrounding the new text that you’ll type. Go ahead and type your new entry. In my case I used Click Me!

You’ll notice that after the new text string has been entered the Compile Script button that was grayed out is now active. I won’t get into what’s involved in compiling a script, but suffice it to say it’s going to make this exercise worthwhile. Click Compile Script and then save the altered file using the Save As command on the File Menu. Do not use the Save command – Make sure to use the Save As command and choose a different name for the file. Save the newly named file to C:\Windows.


Step 2 – Modify the Registry

!!!make a backup of your registry before making changes!!!

Now that the modified explorer.exe has been created it’s necessary to modify the registry so the file will be recognized when the user logs on to the system. If you don’t know how to access the registry I’m not sure this article is for you, but just in case it’s a temporary memory lapse, go to Start (soon to be something else) Run and type regedit in the Open field. Navigate to:

HKEY_LOCAL_MACHINE\ SOFTWARE\ Microsoft\ Windows NT\ CurrentVersion\ Winlogon

In the right pane, double click the "Shell" entry to open the Edit String dialog box. In Value data: line, enter the name that was used to save the modified explorer.exe file. Click OK.

Close Registry Editor and either log off the system and log back in, or reboot the entire system if that’s your preference. If all went as planned you should see your new Start button with the revised text.

Trick to Modify EXE Files

Cool trick to Modify *.exe files

learn how to change *.exe files, in 5 easy steps:

1) Don't try to modify a program by editing its source in a dissasembler.Why?
because that's for programmers and assembly experts only.

try to view it in hex you'll only get tons of crap you don't understand.
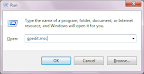
First off, you need Resource Hacker(last version). It's a resource editor-
very easy to use, You can download it at
http://www.users.on.net/johnson/resourcehacker/

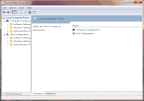
2) Unzip the archive, and run ResHacker.exe. You can check out the help file too


3) You will see that the interface is simple and clean. Go to the menu FileOpen or press Ctrl+O to open a file. Browse your way to the file you would like to edit. You can edit *.exe, *.dll, *.ocx, *.scr and *.cpl files, but this tutorial is to teach you how to edit *.exe files, so open one.

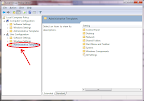
4) In the left side of the screen a list of sections will appear.
The most common sections are
-String table;
-RCData;
-Dialog;
-Cursor group;
-Bitmap;
-WAV.

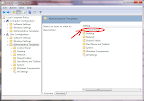
*Icon: You can view and change the icon(s) of the program by double-clicking the icon section,chossing the icon, right-clicking on it and pressing "replace resource". After that you can choose the icon you want to replace the original with.
*String table: a bunch of crap, useful sometimes, basic programming knowladge needed.
*RCData: Here the real hacking begins. Modify window titles, buttons, text, and lots more!
*Dialog:Here you can modify the messages or dialogs that appear in a program. Don't forget to press "Compile" when you're done!
*Cursor group: Change the mouse cursors used in the program just like you would change the icon.
*Bitmap: View or change images in the programs easy!
*WAV:Change the sounds in the prog. with your own.


5) In the RCData,Dialog,Menu and String table sections you can do a lot of changes. You can modify or translate the text change links, change buttons, etc.


TIP: To change a window title, search for something like: CAPTION "edit this".
TIP: After all operations press the "Compile Script" button, and when you're done editing save, your work @ FileSave(Save as).
TIP: When you save a file,the original file will be backed up by default and renamed to Name_original and the saved file will have the normal name of the changed prog.
TIP: Sometimes you may get a message like: "This program has a non-standard resource layout... it has probably been compressed with an .EXE compressor." That means that Resource Hacker can't modify it because of it's structure.

Pop a banner each time Windows Boots

Cool windows trick - Pop a banner each time Windows Boots

To pop a banner which can contain any message you want to display just before a user is going to log on, go to the key:
1. Run the Registry Editor (regedit)and go to
HKEY_LOCAL_MACHINE\SOFTWARE\Microsoft\Windows\CurrentVersion\WinLogon
2. Now create a new string Value in the right pane name it LegalNoticeCaption and enter the value that you want to see in the Menu Bar.
3. Now create yet another new string value and name it: LegalNoticeText. Modify it and insert the message you want to display each time Windows boots.
4. This can be effectively used to display the company's private policy each time the user logs on to his NT box. It's .reg file would be:
REGEDIT4
[HKEY_LOCAL_MACHINE\SOFTWARE\Microsoft\Windows\CurrentVersion\Winlogon]
"LegalNoticeCaption"="Caption here."

Tricks for Keeping Folders Hidden


Step 1 - First create a new folder somewhere on your hard drive
Step 2 - When you name it hold down "Alt" and press "0160" this will create and invisible space so it will apper as if it has no name.
Step 3 - Then right click in and select "Properties" select the tab "customize"
Step 4 - And select "change icon" scroll along and you should find few blank spaces click on any one and click ok

When you have saved the settings the folder will be invisible to hide all your personal files.